29 April 2013

Honey: Possible Acne Cure


Yes, a natural product like honey is actually a superb acne fighter! I’ve tried this myself and all I can say is… IT BLOODY WORKS!

Honey is soothing, moisturizing and has natural antibacterial properties. Instead of regular honey, you can also consider Manuka honey (think of it as a super honey). Whichever you decide to get, I’d recommend choosing one that is raw and unpasteurised as this ensures that the honey is not heated above a certain temperature and thus maintains all its original goody goodness.

Manuka honey is obtained from the nectar collected by bees that feed on manuka trees. This type of honey has natural antibacterial, antimicrobial, antiseptic, antiviral, antioxidant, anti-inflammatory and antifungal properties (Whew! What a sentence!). Manuka honey’s antibacterial activity is due mainly to hydrogen peroxide gradually being released by the enzyme glucose oxidase. Whilst most honeys naturally contain this peroxide activity, Manuka honey also has a unique antimicrobial activity known as non-peroxide activity.


When purchasing Manuka honey, it is also important to note the UMF (Unique Manuka Factor) or NPA (Non Peroxide Activity, but this is less commonly used) rating. These ratings measure the level of antibacterial activity in Manuka honey; the higher the number, the greater the antibacterial activity. To fight acne, look out for a UMF or NPA rating of between 10 to 18.

From my observation, there are Manuka honeys with UMF ratings as high as 25 but I think this is overkill. Not only will it burn a huge painful hole in your wallet, Manuka honeys with such high ratings also increase the potential for it to irritate your skin. (I also read that some sellers may add antibiotics to the honey to boost the UMF rating artificially! So past a certain UMF I don’t trust it)

You can find this at certain Unity Pharmacies in Singapore

 This is the honey I use and I’m very happy with it. You can see from the label that the honey is ‘Active 15%’. I know it doesn’t have a UMF rating but it works. Also, it’s the only Manuka honey I came across thus far that is labelled raw, unpasteurized and organic. The label also states that the honey is extracted at room temperature, so no high heat involved, wonderful!


How to use?

Face cleanser – Simply dampen your face with water, scoop out a chunk of honey and
 massage it around. Once you’re done, rinse off. (Note: not a good makeup remover 
 so use a separate one)

Mask – On a clean face, spread the honey evenly onto your skin and leave for as long
as you want. Rinse off when done. (Honey is most effective for acne fighting   
when it is left in contact on your skin for as long as possible. Try to use it for
at least day and night for 10 mins each time)


Moisturizer - Mix the honey with an aloe vera gel or your moisturizer and apply it as you would a
                      normal moisturizer. (Surprisingly when I did it like this, it really helped to keep even  
                      cystic acne at bay after the initial purge but does not get rid or prevent clogged pores)

Using manuka honey as a mask or in my moisturizer gave me clear skin after about 2 months of daily use. This is a treatment that works in the long term, and yet does not have side effects! I prefer mixing it in my moisturizer though as using it as a mask every morning and night for 10 min can be a hassle after some time. 

Be warned though that honey will cause purging so your acne will probably get worse before it gets better.


Pros:
- It does work to fight and prevent acne
- Gentle on the skin and won't harm or disrupt your natural acid mantle, so no side effects.
- Moisturizing
- Can be used as a spot treatment for painful pimples
- One jar of honey can last a loooonngg time so if you work it out it's cheap
- Is completely natural with no harmful chemicals or toxins!

Cons:
- Takes a long time (can be several months) before you see the final effects, patience is key.
- Messy and may attract ants
- Does not remove makeup when used as a cleanser
- Will most likely cause purging. All the underlying pimples/blackheads/whiteheads you never knew you had are gonna rear their ugly heads. This is definitely a treatment where it will get worse before it gets better. Duration and extent of purging depends on how bad your skin condition is.

This is not a treatment for the weak hearted! 

Hope you found this useful!

Sweet dreams,
PockMarkFats


Sources:

24 April 2013

Charcoal Powder to Spot Treat Your Pimples


Hello my lovelies!

This will be my first product review and good news for you guys, it’s something that is easily accessible and also very cheap! This product that I’ve recently tried out is… … Charcoal powder! Yayyy!!!

I came across this remedy whilst surfing the net (as with most of my other remedies) and it says to look for activated charcoal as it attracts toxins and impurities, hence drawing these harmful substances from our body. Some people also consume charcoal to cleanse internally but I only used it on my skin. Note that activated charcoal is charcoal that has been treated and purified. I won't be held responsible if you use normal BBQ charcoal!!!

Activated charcoal powder can be purchased online from some websites but most of these are based in USA. I was reluctant to fork out $$$ (I sho pooorrr!!!) for overseas shipping and was pleasantly surprised to find it at Watsons in Singapore. 


Ultracarbon tables: Selling at $4.50 per box (20 tables)

Norit: selling at $8.90 per box (30 capsules)

As you can see from the box, these pills are meant to be consumed for diarrhoea, food poisoning or flatulence (Teehee!).

The Ultracarbon version has 20 black tablets that have to be crushed into a powder. What I did was to use a spoon to pound all the tables into a powder. Also, the box states 'medicinal' charcoal so I'm not sure if it is 'activated' but it should work as well. For the brand Norit, the box contains 30 capsules with activated charcoal powder in them so there's no need to do any crushing. Simply split open the capsules!

What used to be a biscuit jar of some sort... ...

So to use charcoal powder to spot treat, just take a pinch of the powder and drip a small amount of water to turn it into a paste. Apply the paste on your pimple (make sure it’s a relatively thick layer) and leave it on till it dries. Once you’re ready to remove it, wash it off with warm water. Easy right??

I find that this remedy works really well for those large pimples that are really painful to the touch and lie under the skin. Use this spot treatment the moment you feel the pimple appearing and it will get rid of it in around 3 nightly applications! It doesn’t work as well on clogged pores or small pimples though. You can use this treatment as an all-over mask but I find that the black charcoal sticks to sebum plugs and is really hard to wash off, so I had to really dig at the plugs to get rid of the charcoal (this is for the Ultracarbon brand as it is the one I tested, not sure if the other brand Norit does the same but I read that it does not stain).

*you can also use bamboo charcoal which has the same cleansing properties but does not leave black stains on your skin. I've never tried this but if you have it would be helpful if you could comment on how well it worked!

Give this spot treatment a shot and let me know how you go!

Hugs,
PockMarkFats

17 April 2013

Quick Makeup Routine: Multitasking Makeup Products


Are you a busy mom who can’t spare 5 minutes to do your face every morning? Or maybe you just don’t want to spend a whole lot of your precious time putting on makeup? Well, this post is for you! I’ll be covering the most basic makeup routine and multi-purpose products to help you look decent in the shortest amount of time. 

Please bear in mind the product suggestions below are quite general and not meant specifically for acne skin. Not all products stated have been bought or tested by me (those with a ‘*’ are those I do not have).

Step 1: Face Base

For those of you who only need minimal coverage, I would suggest a compact powder foundation with SPF. Powder is generally quick and easy to apply and pretty hard to mess up! Loose powders can get quite messy and not ideal if you are rushing out the door.

If you prefer liquid textures, BB creams are a great choice. Not only do most of them have high SPF protection, there is also a wide range for you to pick from depending on your needs and skin type. Different textures and finishes are available, such as full or light coverage, matte or dewy finish, etc. The only downside to BB creams is the limited colour selection; most are suitable for lighter skinned gals. To speed things up, use your hands to apply instead of brushes. Because it is important to protect our skin from premature ageing, select a face base with higher SPF so you can get away without having another layer of sunscreen.

Examples of foundation products with high SPF:


Shiseido Sun Protection Compact Foundation SPF35 PA+++
Has good coverage for a powder foundation and the SPF is 35+++ which is sufficient. I like the cute packaging and it holds a sponge applicator and mirror, making it very convenient for touch ups throughout the day. One disadvantage is that the powder and the casing are sold separately.


From left to right:

Shiseido Sun Protection Stick Foundation SPF36 PA++
Cream type stick foundation with decent coverage but probably not enough for red marks. No oil control properties so not the best for oily skin, and wipes off easily on your clothes. Portable packaging. 

Shiseido Sun Protection Liquid Foundation SPF43 PA+++
Liquid foundation with medium to full coverage and the highest SPF protection of the lot. Complexion can end up looking quite ‘flat’ if too much product is used as the product has a matte finish.

Lioele Triple The Solution BB Cream SPF30 PA++
This brand is not well known locally but has good reviews online. Can be layered for full coverage and has a matte finish with sufficient UV protection.

Most of my suggestions are from Shiseido not because I’m biased but because their makeup have one of the highest SPF coverage in the market. For BB creams, there are also western brands such as Estee Lauder, Kiehl’s, Dior, etc with high SPF but the coverage tends to be more sheer than Japanese brands.

If you have really red acne marks or pimples, you may need concealer on top of your foundation for extra coverage. I suggest a liquid concealer as it is easy to work with and application is also precise if you are covering a small area. The same liquid concealer can also be used to cover up dark under-eye circles. To apply, just place a drop on the area and use your finger to pat and blend! Don’t rub as you’ll just be rubbing off the concealer.


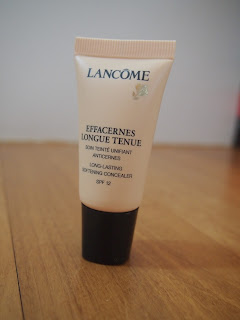
Lancome Effacernes Concealer SPF 12
Easy-to-use liquid concealer that also has SPF. Suitable for covering both red marks and undereye circles with precision. I tried using Bobbi Brown undereye concealer for better coverage but two types of cream products have to be used to achieve the full coverage effect; a colour corrector as the first layer followed by the concealer. This took up too much time and so I eventually reverted back to Lancome.

Step 2: Cheeks and Lips

Personally I think putting some colour on your cheeks and lips is key to having a fresh-faced look. It also prevents you from looking scarily one-toned (think Addams Family) and ‘flat’ from your foundation.

Cream based products are preferred as you can use the same item for both your cheeks and lips (unless you can use powder blush to powder your lips… would it look weird or like matte lipstick???). Another advantage to using the same product is that they will match in colour.

Some suggestions for you to consider:


  Nars The Multiple*
Description from Nars website: Multitasking cream stick for eyes, cheeks and lips with a sheer finish.

Bobbi Brown Pot Rouge for Lips & Cheeks
This product tends to be drying on the lips which makes me sad because I love mine in the colour Fresh Melon.

Stila Convertible Colour*
Another option with a translucent finish, but I’ve never tried this.


Nars Cream Stick Blush
I can’t remember the exact name of this product but I believe it was a limited edition colour (once I saw it I just had to buy.. gorgeous color!). Bought it quite awhile back in Melbourne. Very sheer and dewy finish. I think the colour shows through more if you pat rather than rub it in. 

Step 3: Eyes

It is common to hear that mascara is a must because it opens up your peepers and makes them look bigger. However I don’t find this true for everyone especially if you are Asian with short and sparse lashes like me. Even armed with an eyelash curler and multiple coats of mascara, Asians may not get the same effect as say Caucasians with naturally long and thick lashes. Also, I find it a hassle to remove waterproof mascara at the end of the day and I always end up tugging at my eyelids which isn’t good. I prefer eyeliner over mascara.

Mascara suggestions:

RMK mascaras*
I’ve heard good things about this brand but the price is reeeaaaally a killer! I think it costs around $50 for a tube???

Kiss Me Heroine Make Long and Curl Mascara*
This is highly rated on Makeupalley with 4.3 out of 5 lipsticks. In my experience Japanese-brand mascaras are good for holding a curl and they are very smudgeproof/waterproof but also extremely hard to remove unless you use oil-based removers.

Eyeliner suggestions:

MAC Powerpoint Eye Pencils
I have these in multiple colours! My favourite eyeliner pencils because they are the most smudgeproof pencils I have found (made even more smudgeproof when paired with Urban Decay’s eye primer, another great product!). Great choice in terms of colour range.


Bobbi Brown Long Wear Eye Pencil
Relatively new product with a more creamy texture than the MAC ones, so it glides across the eyelids with much less tugging. However it is slightly less smudgeproof than MAC.

(Optional) Step 4: Highlight

Steps 1 to 3 should be more than enough for your daily routine, but if you have the extra time you can quickly do some highlighting to really brighten up your complexion.

Highlighter pens are easy to use and can be blended in with your fingers. Another option would be to choose a slightly shimmery eye shadow that is one tone lighter than your skin (if you have oily skin, you may want to reconsider the ‘shimmery’ part as it can make you look oilier. Maybe try a matte colour instead). Apply the highlighter on the high points of your face, such as the brow bone, your forehead, along the top of your nose and also on top of your cheek bone.


YSL touche Ã©lcat
Famous highlighting pen that can also be used to conceal and brighten light under eye circles. The pen applicator makes it easy to swipe colour on and then use fingers to blend. (btw, I have a spare and brand new YSL touche Ã©lcat in colour N3 that I'm willing to let go for below retail price. Leave a comment with your contact details or email me if you are interested in taking it off my hands!)

That's about it for this post. If you find the above to be too many steps, my advice would be to play up your favourite features while leaving the rest simple!

Love,
PockMarkFats

04 April 2013

My Thoughts on Hyaluronic Acid


Ever since Japanese brand Hada Labo came to town, almost every blogger or skin care addict has raved about their best selling product, the Hada Labo SHA Hydrating Lotion. Since the main ingredient used in all products from this brand is hyaluronic acid (or ‘HA’ for short), the company has wasted no time or expense to promote this ingredient as the next best thing for our skin. This has resulted in HA being promoted to almost god-like status in the skin care industry. Suddenly, every brand of skin care that has had HA in their products began emphasizing its inclusion in their list of ingredients, even if that product had already been in the market for donkey years.


I am ashamed to say, I too fell victim to the hype, and very enthusiastically… …


Since HA is being marketed aggressively by skin care companies (and also seeing that some brands are charging ridiculous amounts of money just because their products have this ingredient), shouldn’t we ask ourselves what exactly is HA? What does it do? Is it really worth the hype?

HA is basically a carbohydrate or more precisely, a mucopolysaccharide. It is present naturally in our body and some of its main functions include lubricating the joints and muscles and contributing to tissue repair. The greatest concentration of HA is found in our skin tissue. Because it is hydrophilic (aka. water-loving), its ability to bind up to 1000 times its weight in water makes it a good hydrator for the skin. When we are young, our skin’s ability to produce HA allows it to appear healthy and firm but this diminishes as we age.  


I took these pictures hoping to show the texture of HA. It is sort of a gooey, slightly viscous liquid in these products. Note that the higher the concentration of HA, the more viscous will be the product.


Based on the sheer number of positive reviews for products containing this ingredient, both by word of mouth and from the online community, I can’t deny that HA definitely does something. According to some of the praises:

Ÿ Pores appear smaller

Ÿ Skin is firmer (as Hada Labo adverts would call it, that ‘boing boing’ feel)

Ÿ Skin is more hydrated


These are the general benefits that majority of users report. There are a handful that claim HA helps with their pimples because their skin is sufficiently hydrated (note that this product doesn’t actually fight acne, but if your skin is dehydrated and breaking out because of that, this may help). As there are quite a few products in the market containing HA that are also completely oil-free, this makes HA serums one of the most suitable moisturizers for acne-prone or oily skin simply because it is very unlikely to clog pores.

Personally, I have tried many versions of HA serums, all of which are oil free and I do experience all the positives that other users have reported. Oh… the firmness, the level of hydration and just the glow that I got once the HA serum sinks in. And people, all these benefits can be observed instantly. Take note that serums with more HA will give you better and more instantaneous results.

HOWEVER… ALL products containing HA BREAK ME OUT. Seriously, it’s ridiculous. The gods above have decided to deprive me of the one miraculous ingredient that most people can use. Har dee har har.

On the plus side, I don’t seem to be the only one that breaks out from HA (yes yes its selfish but it’s better to be sad together with other people so I don’t’ feel so alone… sniff). Do an online search and you will come across a very small number of similar reports. We all love the results, but we just can’t use it. So if you are experiencing the same thing, don’t panic, you’re not alone!

Another thing to note about HA is that the effects tend to be temporary. So to maintain it you’d probably have to use it continuously (forever and ever and ever… although, then wouldn’t the effects be sort of permanent? Haha!). 

Also, for those of you who are paying an arm and a leg or selling off your unborn child to get HA products, I have news for you. HA can actually be obtained pretty cheap and the serum can be done yourself at home. You just purchase the HA powder online and mix it with water (gardenofwisdom is one such site). I have tried this before and the mixture starts of viscous and sticky but after some time it becomes watery and diluted, maybe because I did not add any preservatives. THE POINT IS, even if you are buying it off the shelf, you shouldn’t be paying a lot for it.

So to conclude my longwinded post (gosh, I’m such a naggy old lady), I think it is worth trying out a HA product to see what it does for you, especially when most of the feedback has been positive. If you are one of those that don’t see any benefits or has an adverse reaction to HA, well all I can say is, join the club! Heh heh heh!


PockMarkFats

P.S. Sodium hyaluronate is the salt of HA and may be a gentler option for those who cannot tolerate HA. Of course the results are also less outstanding but it is a good way to compromise and at least get some of it in your skin. I myself avoid sodium hyaluronate because I suspect it clogs my pores and breaks me out, although not as bad as with HA.


Sources: 
http://en.wikipedia.org/wiki/Hyaluronan
http://www.hyalogic.com/main/about_hyaluronic_acid

Related Posts:

Related Posts Plugin for WordPress, Blogger...